

The 1980’s called and they want their PDW back. But they aren’t getting it.
The LaFrance M16K was a gun ahead of its time and it’s still a slick, compact, and potent option today. Most of us will never get to touch a real, full auto M16K and the unique upper receiver made cloning one tough for most folks. Thanks to Mayhem Machine Tool, though, it’s now easy to build a pistol or SBR clone of this iconic M16 variation.
What is an M16K?
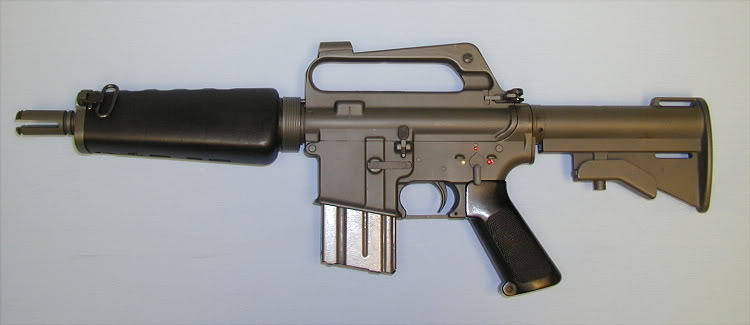
The M16K was the creation of Tim LaFrance and his shop, La France Specialties back in the 1980’s. It was designed for close-in use by executive protection details, vehicle crews, or SWAT entry teams in tight quarters. The M16K was a SMG-sized package with a rifle’s punch. Keep in mind that during this era the Colt Commando or HK 53 were about the smallest 5.56mm’s readily available.
Tim La France had a couple tricks up his sleeve to shrink the Commando down even further, and make it a discreet platform for protection details and the like. He used an 8-inch barrel with a special double gas block gas system designed to ensure reliable function. It used a set of cut-down A1 triangular handguards and a 4-prong flash hider.
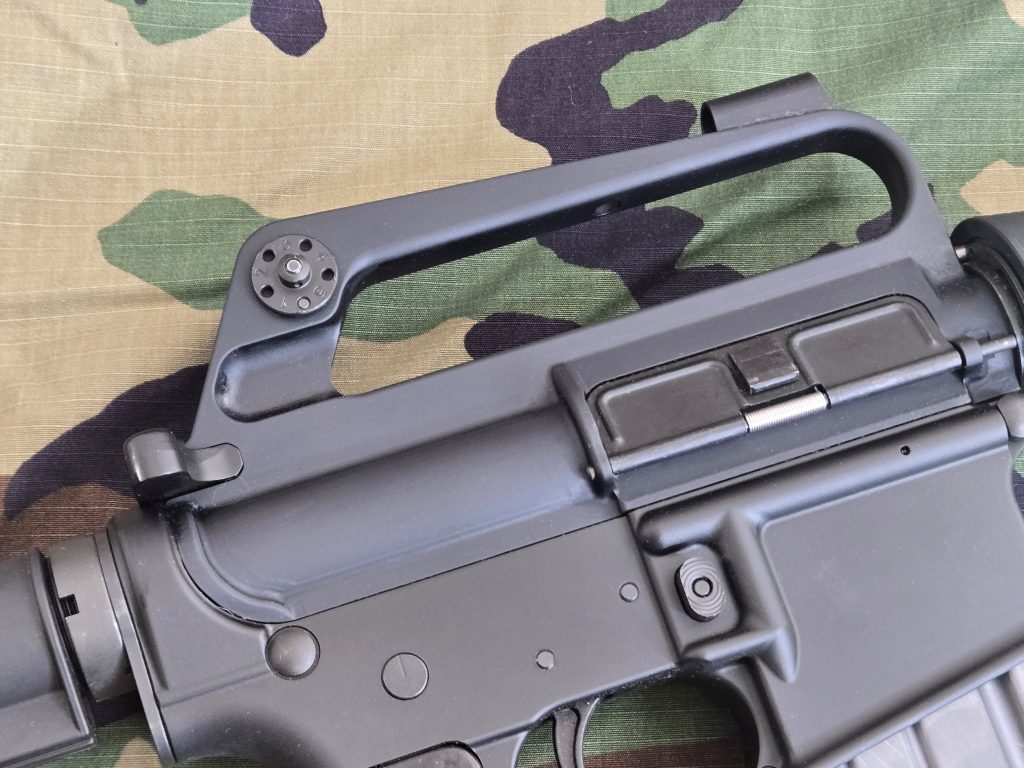
Most notable for the era is the lack of a front sight base. This was before flat top uppers were common, so that was unusual. The upper receiver was a standard M16 slick side carry handle upper, but with a twist. Being that there was no front sight post, Tim added a cylindrical front “sight” braised onto the forward part of the carry handle. The thought behind the sighting system was that it was easier to line up fast from inside a vehicle.
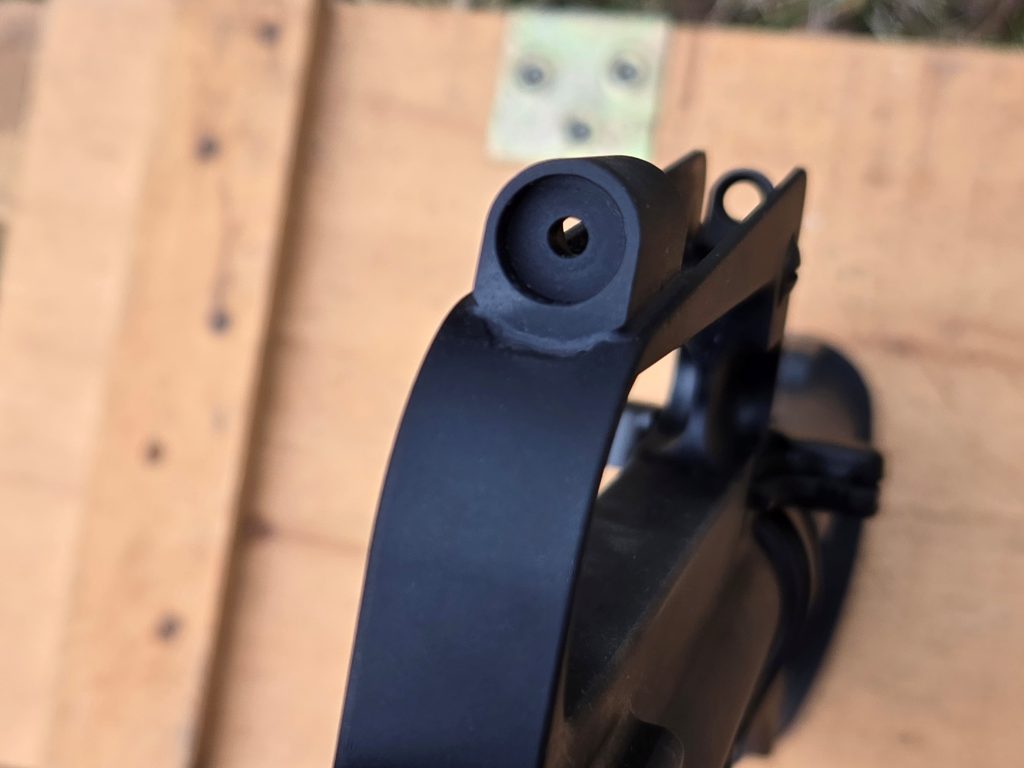
I put sight in quotes above because it isn’t what you usually think of when you think of a front sight. The front is just a short tube that gives you a donut-like ring. To shoot you basically line up your rear peep with the front donut. Rather than lining up a front post, you’re looking through the peep aperture and the donut hole. Drop the hole on your target and fire. It isn’t as precise as a regular set of irons, but it was designed to be fast and rugged.
The lower was pretty standard M16A1 fare with the LaFrance markings. A two-position buffer tube and CAR stock were fitted. A special end cap was used to accept the modified A1 handguards. It had a front sling swivel added since you didn’t have the traditional FSB swivel present.
Cloning the K
The M16K definitely had a unique look and filled a specific niche. It got some movie time as well, showing up in The Naked Gun in 1988, Escape from LA, and Death Wish 4. My son’s theory is that if a movie doesn’t have a sequel, it must not have been any good. Death Wish had at least three sequels so it must have been great, right? Anyway…
Being that real M16K rifles were pretty much unobtanium, the next best thing was to make a clone, but there were issues. The biggest holdups in cloning an M16K are the carry handle sight, the barrel assembly, and the handguard end cap. The rest of the parts are pretty much standard so they weren’t an issue.
You can do a rough and ready carry handle sight by 3D printing a front sight that bolts on to a regular AR carry handle upper. The files are available online in a few variations. It works, and has the right general look, but it’s not as durable as an integral aluminum sight. Plus, you can tell the difference with little more than a cursory glance. There have been custom uppers done over the years with gunsmiths brazing a front sight ring on, like Tim did, but these seemed to be done on a more or less one-off basis. They weren’t something that was readily available.
The other issue was getting the correct endcap and gas system to do a K build. There really was nothing available like what Tim had done so clones were again made basically on a custom one-by-one basis. Either guys got a gunsmith to make them the parts, or they persuaded folks who are handy enough to figure it out on their own at home. A standard triangular end cap works, but isn’t technically correct. It also doesn’t allow you to mount a sling.
Enter Mayhem Machine
Mayhem Machine Tool is a machine shop out of New York (of all places) that makes billet retro uppers. They do the standard slick side, A1, and C7 models, but they also do some unique versions that are either uncommon or simply not found elsewhere. I used their Nuke upper on my Colt 635 SMG clone before H&R had their uppers available. They also make a Colt 605 style upper that I don’t think anyone else does.
The M16K is another one that I don’t believe anyone else is doing. I caught wind of the project on social media last spring and have been tracking the progress ever since. In late December 2024 the uppers finally dropped and I grabbed one of the first ones for my build.
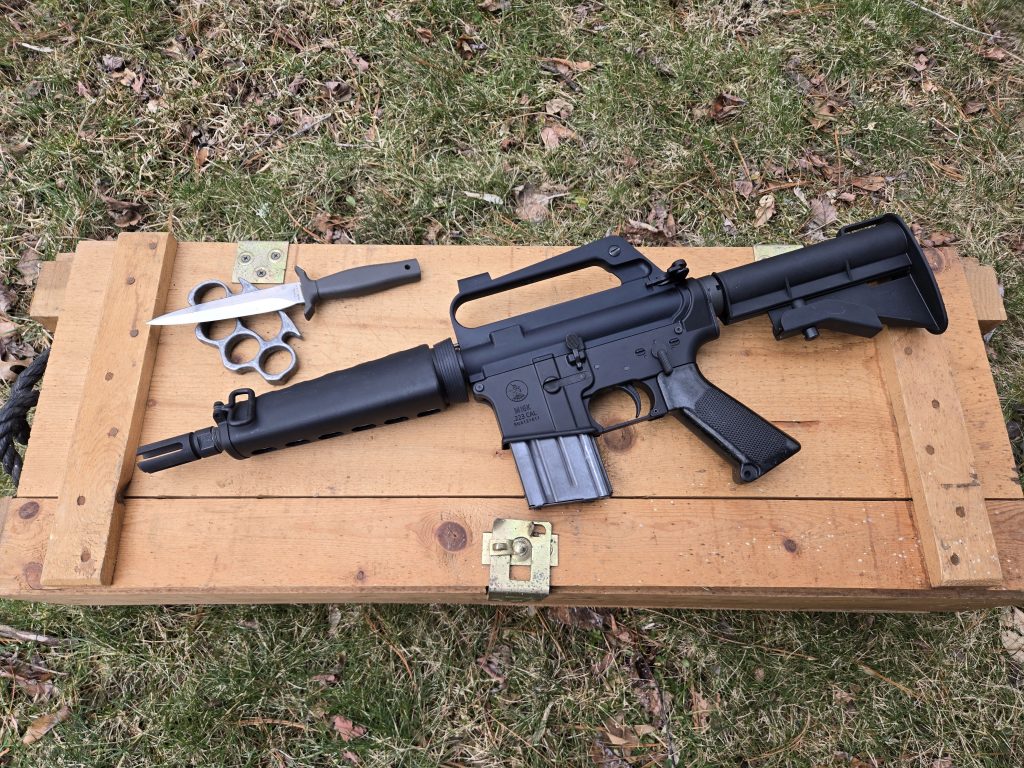
The Mayhem Machine uppers are precision machined from 6061 aluminum. You can get them either in the raw aluminum or with a black anodized finish. I opted to get mine anodized since I was going to use a black anodized lower on my build. Original LaFrance guns were Colt Gray from the pics I’ve seen.
Rather than brazing the front size tube on, Mayhem Machine integrates the front sight tube with the carry handle as part of the CNC process. The machine work and tolerance are excellent. There were no obvious tool marks and there was no issue with assembly. My Nuke upper was the same way, so I didn’t expect any problems with the K upper.
Always Start a Project With a Bad Attitude
Once I knew the K uppers were coming, I ordered a lower from Bad Attitude Department. Now, here’s where I’m going to say my clone build is inspired by the LaFrance guns, and not a direct clone. Bad Attitude uses A2 forgings, although A1 forgings are coming in the near future. I was fine with that for this build though.
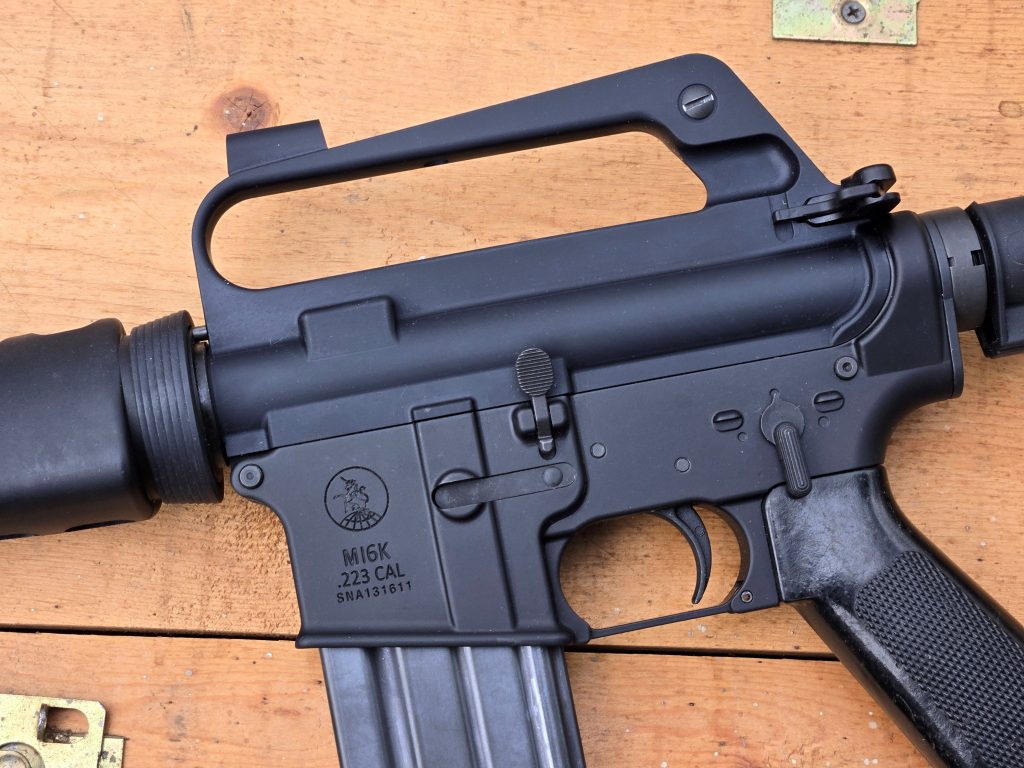
They offer very reasonable custom engraving and I discussed what to do with the K build. Being that Tim LaFrance is still in business, we weren’t going to outright copy his markings. What I ended up doing was using LaFrance style selector switch markings, but my own K markings on the left side of the receiver. The LaFrance markings are actually on the fright side of the magazine well on a real M16K.
I marked mine M16K, and caliber .223, which is how the original caliber marking was. Since this was my own take on a K, I used the Colt-inspired Unicorn that my daughter designed for me for my N23A1 build. It’s my take on a K, so I went with my own markings.
Black River Tactical Barrel
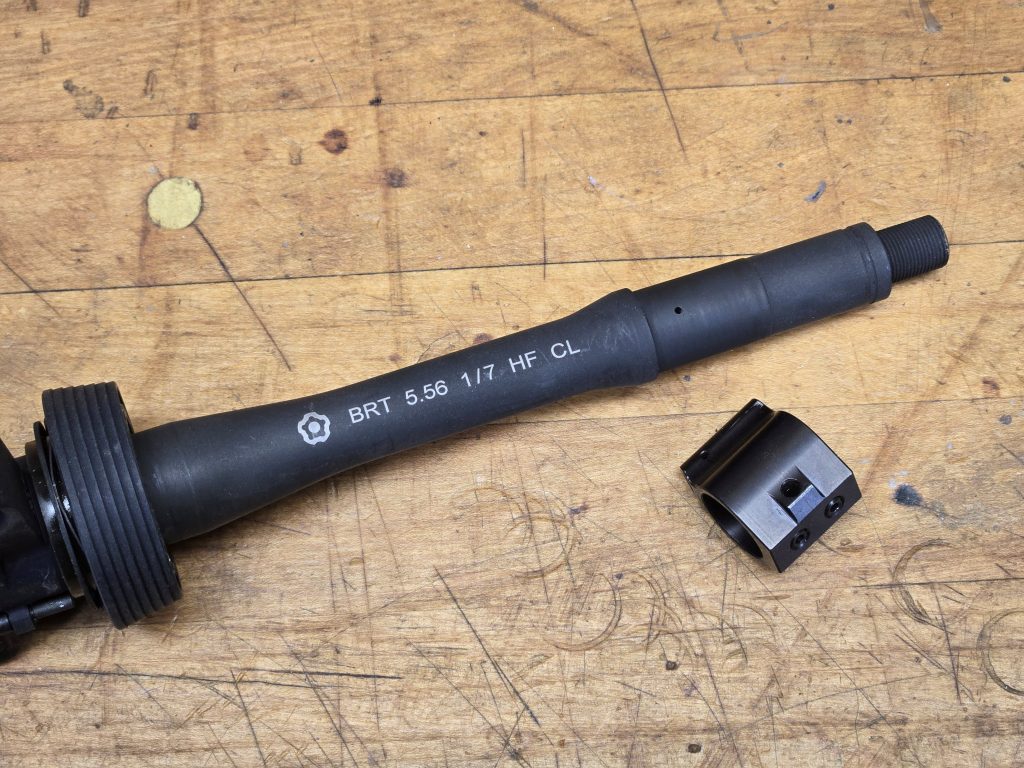
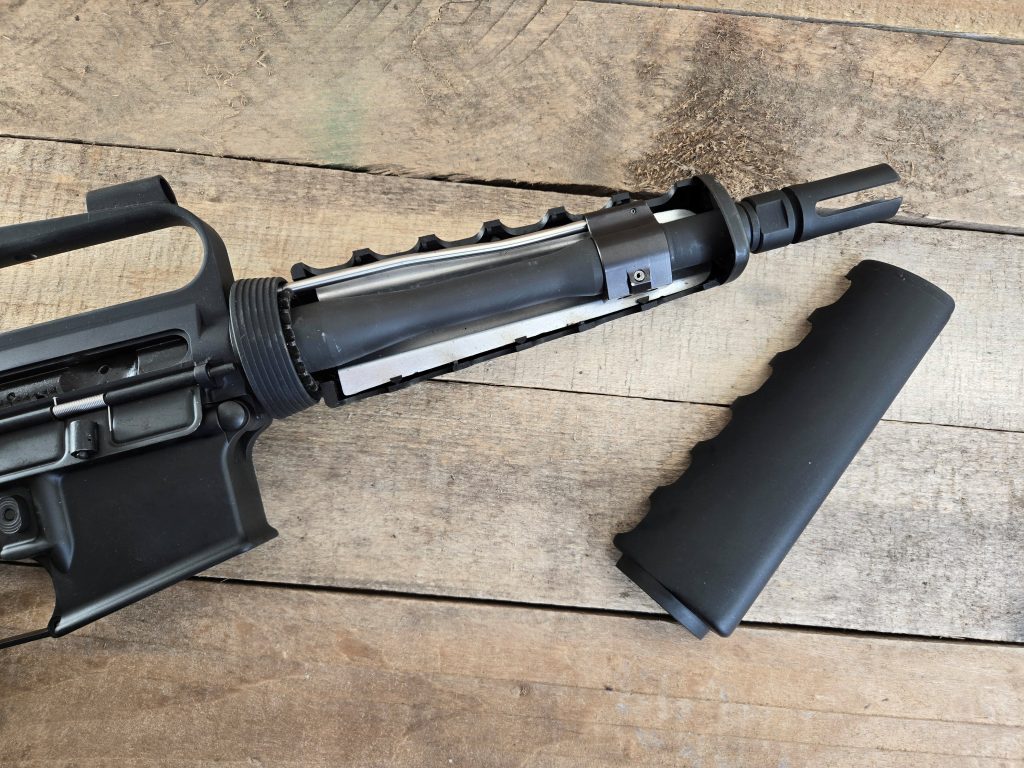
While I was waiting on the upper, I started researching what to do for the barrel. I was unsure how I was going to mimic the K initially. As far as handguards go, carbine-length A1 handguards are readily available now. I’ve had a set for a while waiting on a project so I already had them on hand. I’m pretty sure mine came from Linemount, but JSE Surplus has them as well. I started looking for an 8-inch barrel and pondering what to do for the gas block and end cap. While looking, I stumbled onto Black River Tactical online. It turns out that their barrel setup was exactly what I needed.
They offered an 8.3 inch “Optimum PDW” barrel with their custom gas block. It’s a hammer-forged barrel with a chrome lining. The key factor, though, is the groove and snap ring that they provide that allows you to mount a standard carbine endcap ahead of the gas block. This was exactly what I needed for my build. I ordered a barrel and just swapped out the provided round carbine end cap for a triangular cap that worked with the triangular carbine handguard I had. It ended up being a very simple solution to what I thought was going to be the hardest part of the build, aside from finding a correct K upper.

The Build
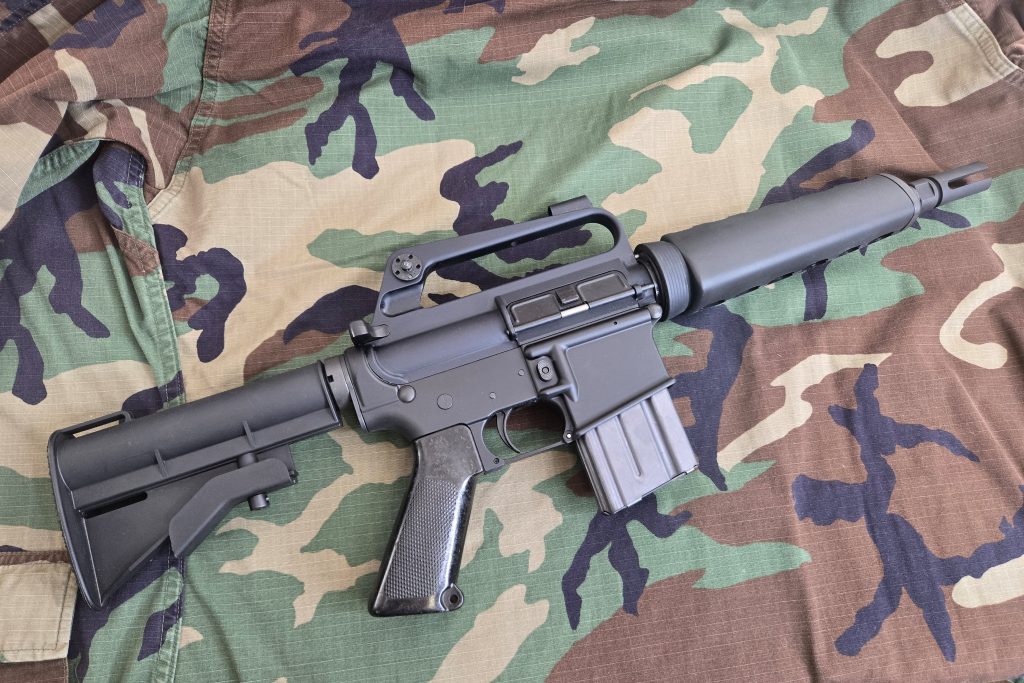
With parts in hand, I started putting everything together. I have actually had the lower half together since last spring while waiting in the uppers. I used the BAD lower with a B. King lower parts kit, and a two-position buffer tube from Doublestar. I had the receiver engraved in anticipation of SBR’ing the build, but added an H&R HAR-15 brace when they came out, while I waited on my Form 1 to clear. I swapped it out for a standard CAR stock once I got my tax stamp.
Upper assembly was fairly simple with one caveat. The upper comes stripped so I added an ejection port cover from my parts bin and an H&R rear sight kit. I swapped out the A1 aperture, though, for an A2 version. I generally prefer the bigger A2 aperture and found that the bigger aperture lined up with the front K donut sight more easily.
As for the build caveat, you’ll find that the front sight on the K upper keeps it from fitting in a typical clam shell-style upper receiver vice. You could theoretically Dremel out a pocket in the clam shell to accept the K sight, but being that I don’t anticipate building another K, I didn’t want to do that. Your next best bet is to do the barrel installation with a reaction rod. Don’t use one of the upper vices that lock the upper in using the takedown lugs and pins. Don’t ask me how I know. Just use a reaction rod to start with.
I used a standard GI barrel nut and slip ring and torqued the barrel on as normal. I lined up my gas tube and set it in lace. Black River Tactical uses two set screws as you see on many low profile gas blocks. They also provide a roll pin that engages a groove on the barrel, much like what you see with the taper pins and a standard front sight base.
It’s solid, and isn’t going anywhere once installed. With the gas block in place I slipped on my triangular end cap and used a pair of snap ring pliers to install the provided snap ring onto the barrel groove.
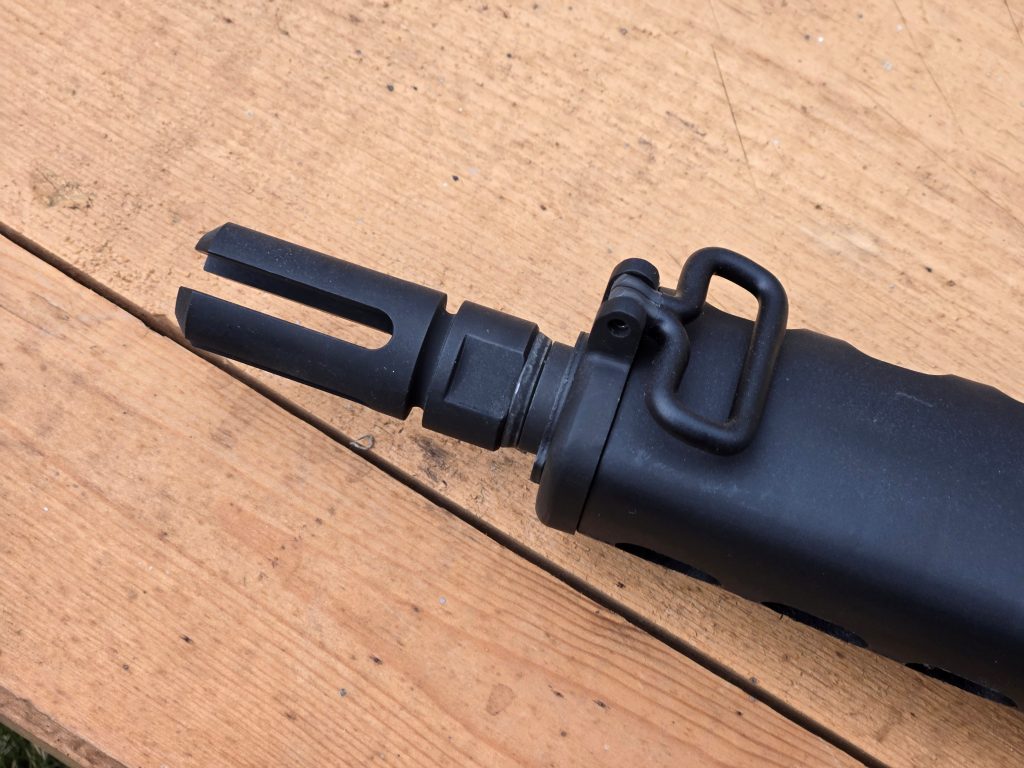
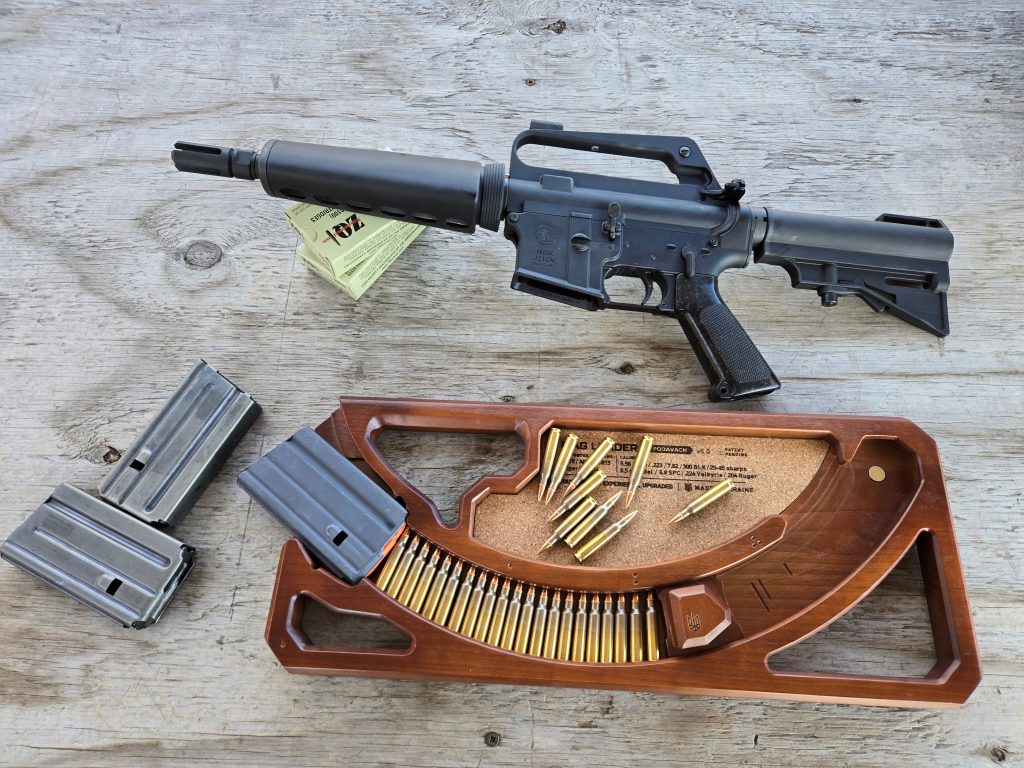
I used a Young Manufacturing 4-prong flash hider that I picked up from JSE Surplus. It had the look of the original K flash hider and was very reasonable. I then installed the handguards and dropped in a basic GI charging handle and a Toolcraft BCG from my parts bin.
My completed K looks good. It has the right style and feel, barring the standard end cap. At the time of the build, the K style end caps weren’t readily available, but I found out that American Icon is working on a K build themselves and has done some end caps. I was able to snag one of their first ones, so I swapped the standard end cap out for the K style with sling swivel. They’re still early in their K project but keep an eye on them for parts in the future. Since that time, I also saw that Onyx Arms is offering K part and Mayhem Machine uppers as well.
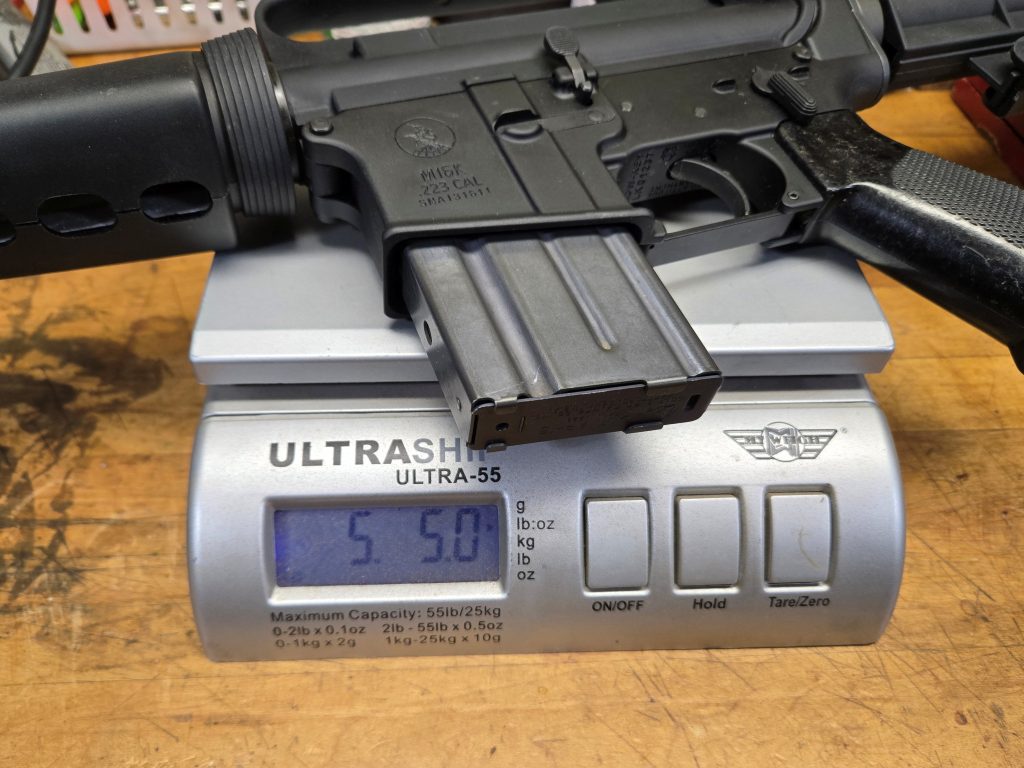
The gun is light and handy. It’s only 24 inches overall with the stock collapsed, and weighs 5.5 pounds. Without the front sight base, it’s pretty sleek and low profile. With the integrated carry handle sight, there’s nothing to get knocked off zero or readily break either. It’s basically a big fixed sight pistol at this point.
Range Time
I got my build together in the middle of the Western Pennsylvania winter so I didn’t have a lot of good range days available. I settled on a sunny 32-degree day in between snows. It was cold and a little sloppy, but at least it was double digit temps and I wasn’t trudging through snow. The first trip out was before my Form 1 came back so I had the HAR-15 brace on it. I also still had the standard end cap on the gun at that time. I ran the K with another retro build, the Colt 608 clone I wrote up not long ago.
I used a mix of 55gr and 62gr FMJ loads for my testing. Back when Tim LaFrance did the first M16K’s, getting short barrel M16’s to run was something of a trick, which was why he had his double gas block system. Times have changed, though, and I guess we learn things as we move on. The gun ran flawlessly with the Black River Tactical gas system, which I was happy to see.
Using the double donut sight system is interesting. It’s fast to pick up, but as I noted, it’s not super precise. It’s a little weird at first just lining up the rings. You want to look for a front sight post, but there isn’t one. You just line up the rear aperture ring with the ring of the front sight. If you see a clean circle, you’re lined up. If the circle is occluded, you aren’t. That’s all there is to it.
Being that this is a close-in PDW design, I did my shooting standing, offhand at 25 yards. I had some 1 liter bottles and a tennis balls out on the backstop. I didn’t see a point in trying to shoot groups with this sight setup. Plus, I like to shoot at “stuff.”
At 25 yards I found that I was hitting an inch or two low. Keep in mind that this is a fixed sight set up. Any adjustment is by old fashioned Kentucky windage. If I put the circle at the top of the target, I could get regular hits and was bouncing the liter bottles around regularly.
The tennis balls were a little trickier, but I still tossed those around relatively well. I definitely menaced them with close hits, even when I didn’t bounce them. Call it a softball-sized area. For a PDW, that’s probably close enough for government work. In fact it must have been, being that the real M16K’s found their way into police, military, and executive protection details.

Another Grail Gun
Being a GenX kid and growing up in the 80’s, I remember reading about the M16K back when it was new. And yes, I saw its movie appearances, too. It was a unique design with a mysterious air about it, but I never thought I’d own one. Kind of like the Colt 601 clone that I was able to put together last year.
Thanks to Mayhem Machine, with some help from Black River Tactical and Bad Attitude Department, not only do I actually have one, it really wasn’t that hard to put together. With Onyx Arms coming online with K parts and American Icon working on them as well, it should be downright easy to do a K clone now.
Aside from not being full auto, my build isn’t a one-for-one clone, but it’s pretty darn close. Anyone who sees it and knows what the K was will recognize it immediately. It’s a fun gun to shoot, and a great addition to my retro carry handle collection.