

I have OCD…just ask my wife. Once I get involved in a project I obsess over it. If it’s a collection, I must have all the things. Way back when I started building retro rifles my goal was simple, I just wanted a rifle like the M16A1 I was issued in basic. Later than turned into, well if I have an A1, why not an A2? Or an A4? What about an M4 or an XM177? And thus the clone wars began.
Some builds are easier to do than others though. The further back in M16 history you go, the more obscure variations you see, and the harder they are to clone. The Colt 605, which is essentially an A1 dissipator is doable, I just haven’t gotten around to it. The 606 is a Heavy barrel model that I’m actually not super interested in. So maybe my OCD does have some boundaries. The 607 carbine with its unique sliding stock is bad ass, but finding the stock is tough and/or expensive. Maybe someday. The Colt 608 aircrew survival rifle was one I figured was unobtanium. Only around 10 were made originally. Although there are a few clones around, they were either basically hand built, or sourced from limited numbers of clone kits that haven’t been available for years as best I can tell. Enter American Icon.

The American Icon 608 Clone Kit
You may remember American Icon from the article I did covering their excellent wood A1 pattern AR stocks a while back. They do a killer job on the retro pattern wood, but that isn’t all they’ve been up to. They recently released the parts to make a 608 clone of your own. American Icon is having all of the impossible to find pieces to build a 608 custom fabricated. They’re offering them in as the 608 Retro Mod Build Kit that finally makes it easy to do a pretty nice rendition of a Colt 608. I managed to get one of the first 50 kits made, so let’s take a look at what you get.
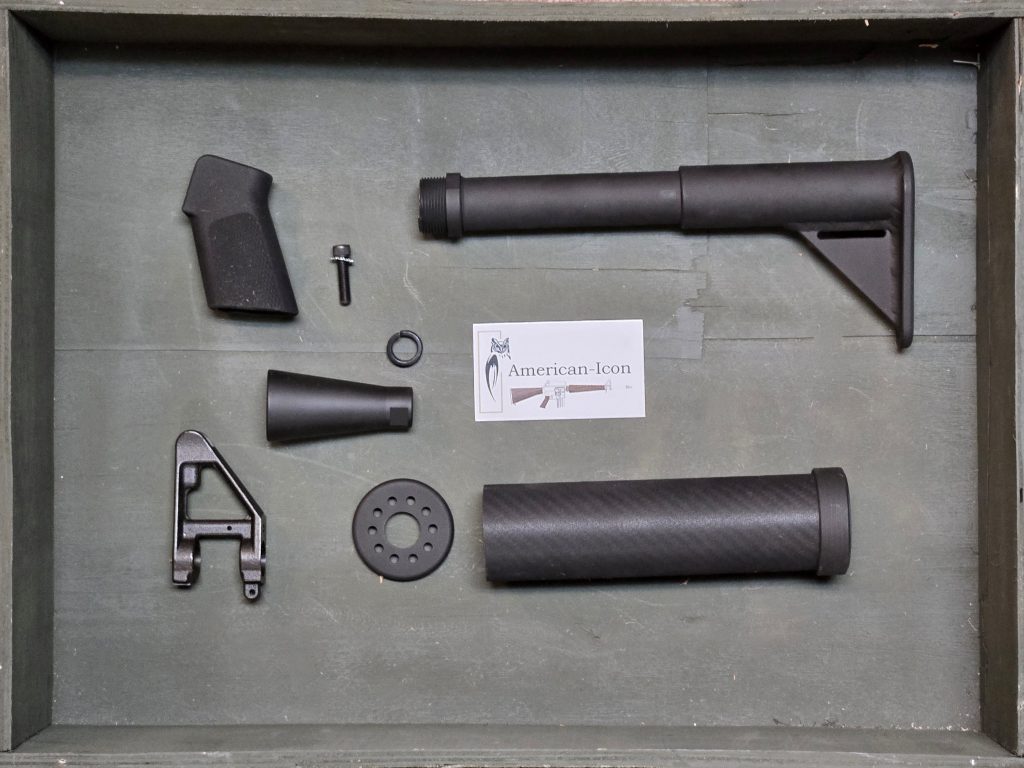
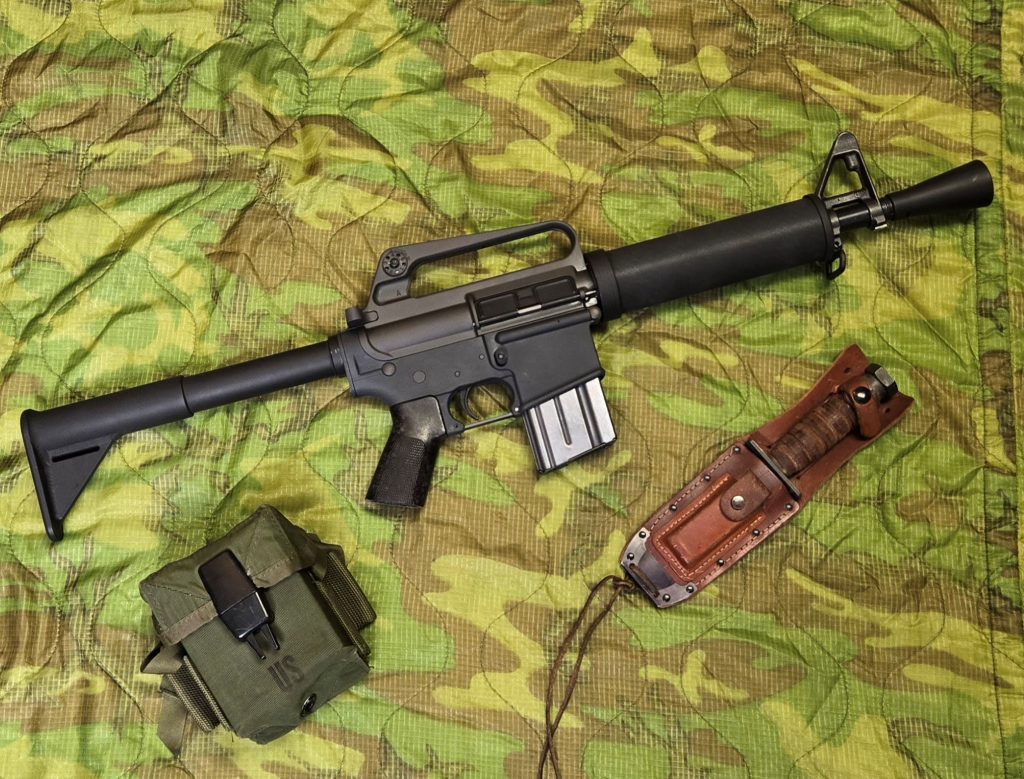
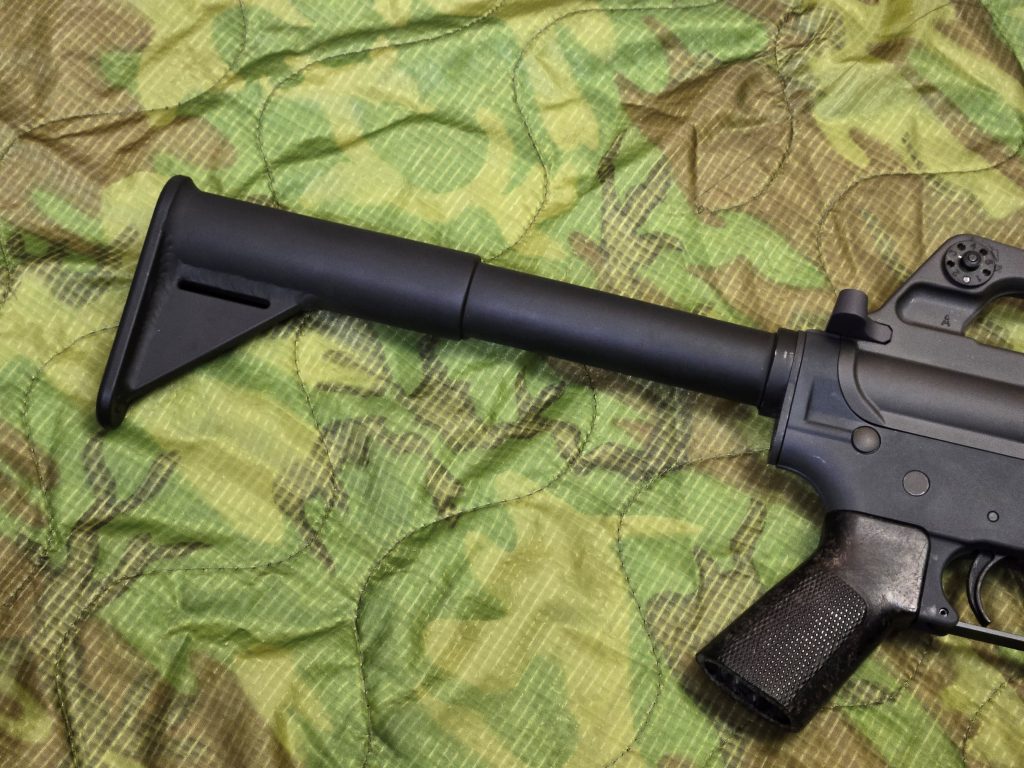
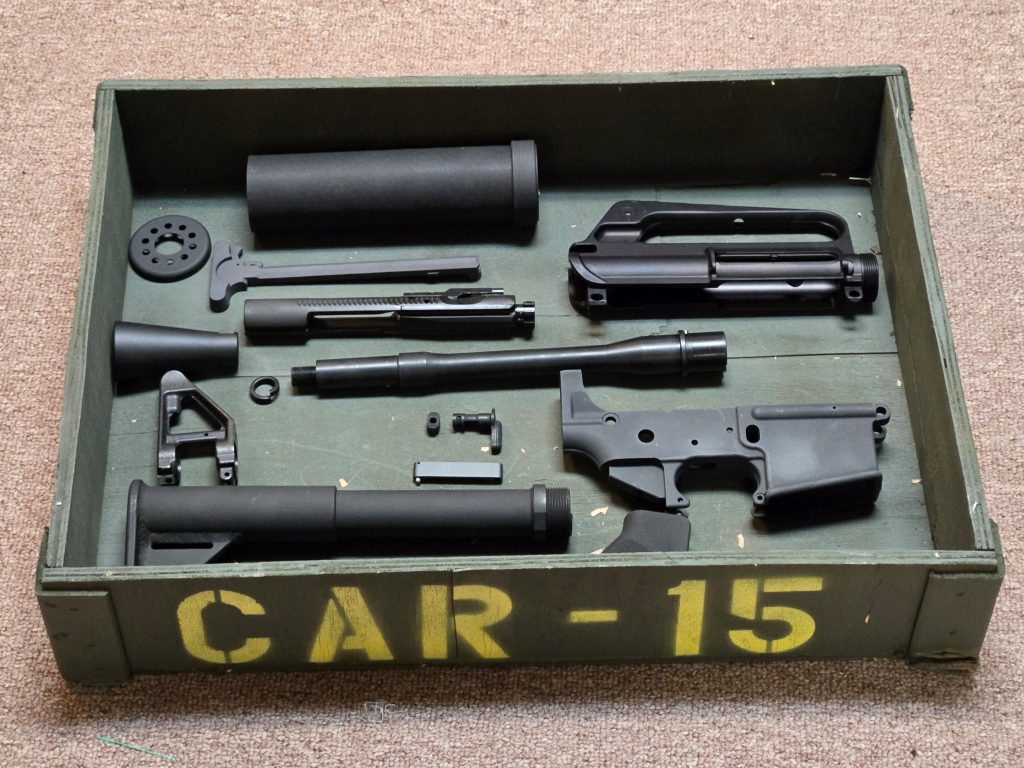
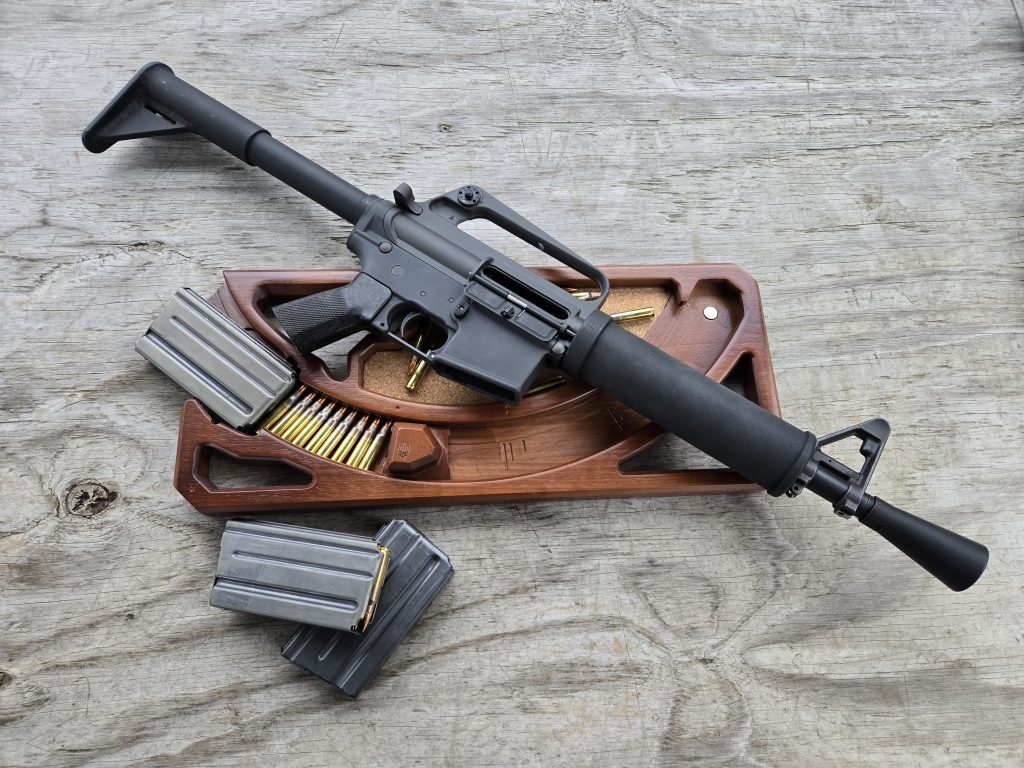
The American Icon kit consists of an aluminum receiver extension with buttplate. It’s all welded as one piece, and accepts a standard carbine buffer and spring, and CAR end plate. The buttplate has a sling slot located on the horizontal access. Of the original 10 or so 608’s made, we saw a few stock variations. There was a mix of the slot being in this position, or along the angled portion of the stock support. I asked about what prompted the horizontal choice over the angle, and was told that the gun rides closer to the body with the horizontal sling slot versus the angled one. Makes sense, and both are equally accurate.
My 608 kit came shipped in a nifty wooden crate. It was marked ASR, for Aircrew Survival Rifle, on top. One side is marked CAR-15 and the other MK 608. The crate was actually nailed shut and I had to pry it open. It was a fun way to package the kit. This was a test run, but American Icon is considering doing the crates with all of the kits, or maybe as an option. If you like the idea and are interested, shoot them an e-mail or message them on social media with what you think.
Next up is the tubular handguard assembly. It consists of a barrel nut and a carbon fiber tube that threads on to the barrel nut and an end cap that goes on the front of the tube. Original tubes were made from fiberglass, but it’s actually more economical to make one out of carbon fiber today and it’s probably stronger and lighter weight, while training the correct look.
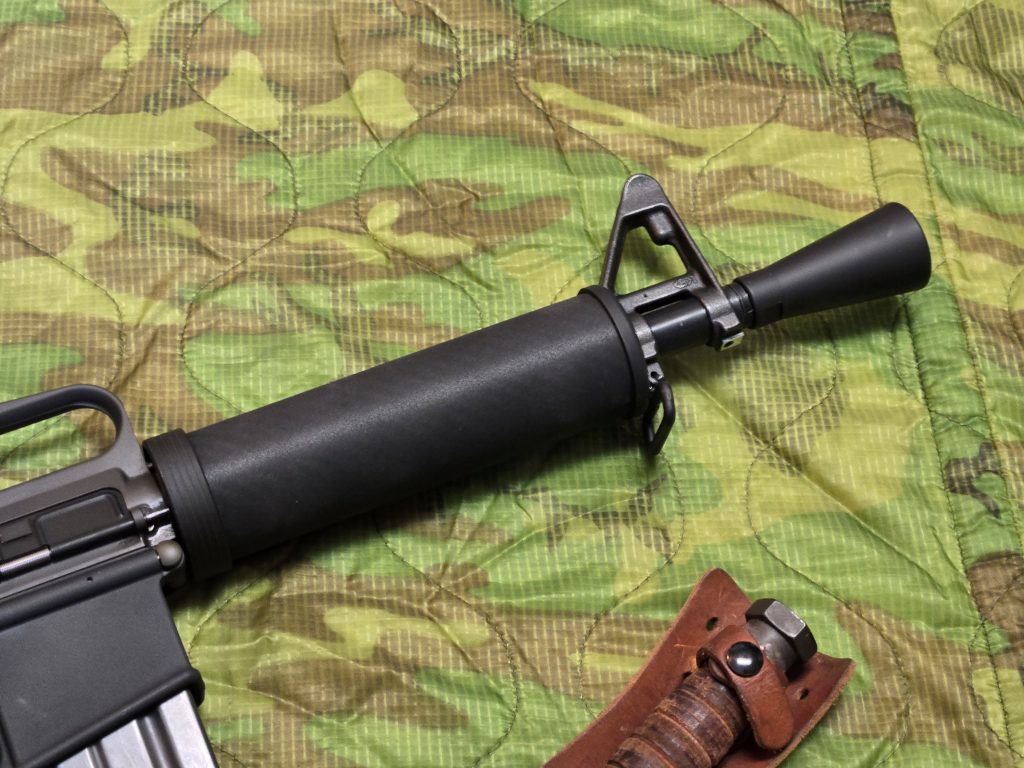
Moving forward on the build, American Icon provides a .750 inch diameter non F marked Front Sight Base (FSB). The front sight base is affixed with set screws making it easy to install once you attach your handguard. This also allows you to tear the front end down and remove the handguard for maintenance if you need to. The other option would be to install the handguard, then drill and install an FSB with taper pins. That is admittedly more clone correct, but harder for most folks to do, and makes maintenance tougher. The FSB comes with an A1 front sight installed, and has the bayonet lug removed like the original. You will need to provide a sling swivel and rivet if you want one on your build.
Capping off the 608 is a conical flash hider and split ring washer. The 608 came with either the cone flash hider or an XM177 style moderator. Personally I think the cone flash hider was the right choice. It’s unique, and kind of iconic if you see the original 608 pictures. Lastly you get a chopped A1 repro pistol grip and grip screw.
Price on the 608 kit is $499.99, While I’ll admit that isn’t inexpensive, all of these parts are limited run, custom built. They’re otherwise unobtainable or even more expensive if you happen to find any from earlier kit offerings. Ordnance Research used to offer a 608 kit that they list at $1100, over twice what the American Icon kit runs. It still shows on their website, but I’m not sure how long since it’s been in stock.
What Else Do You Need?
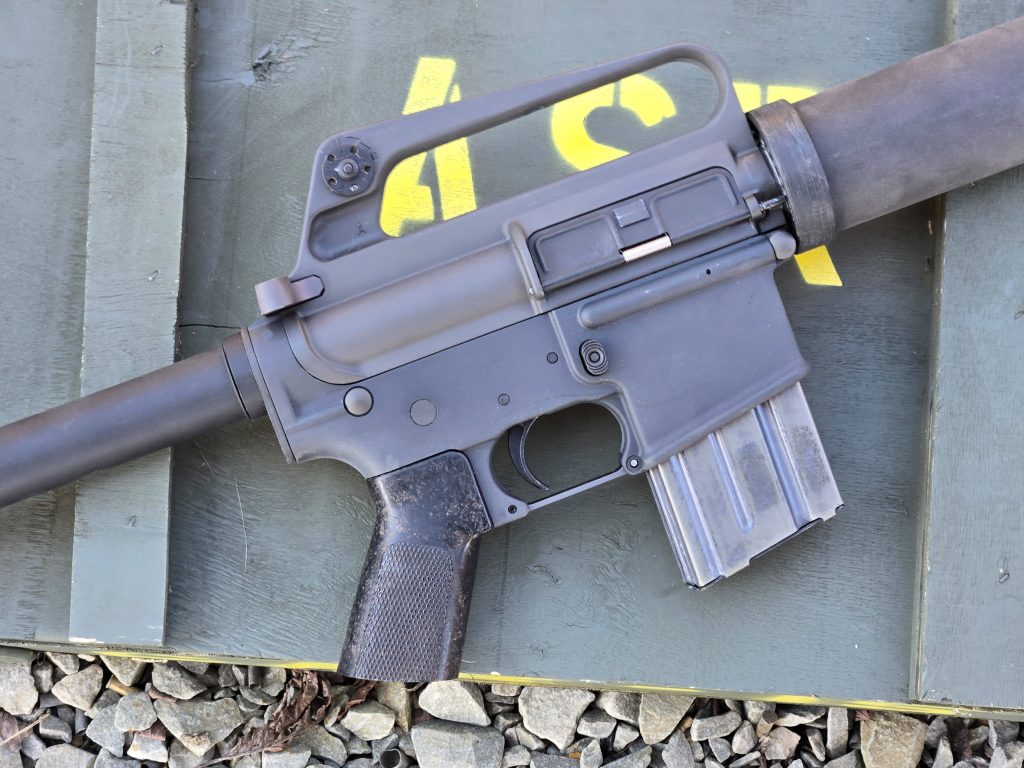
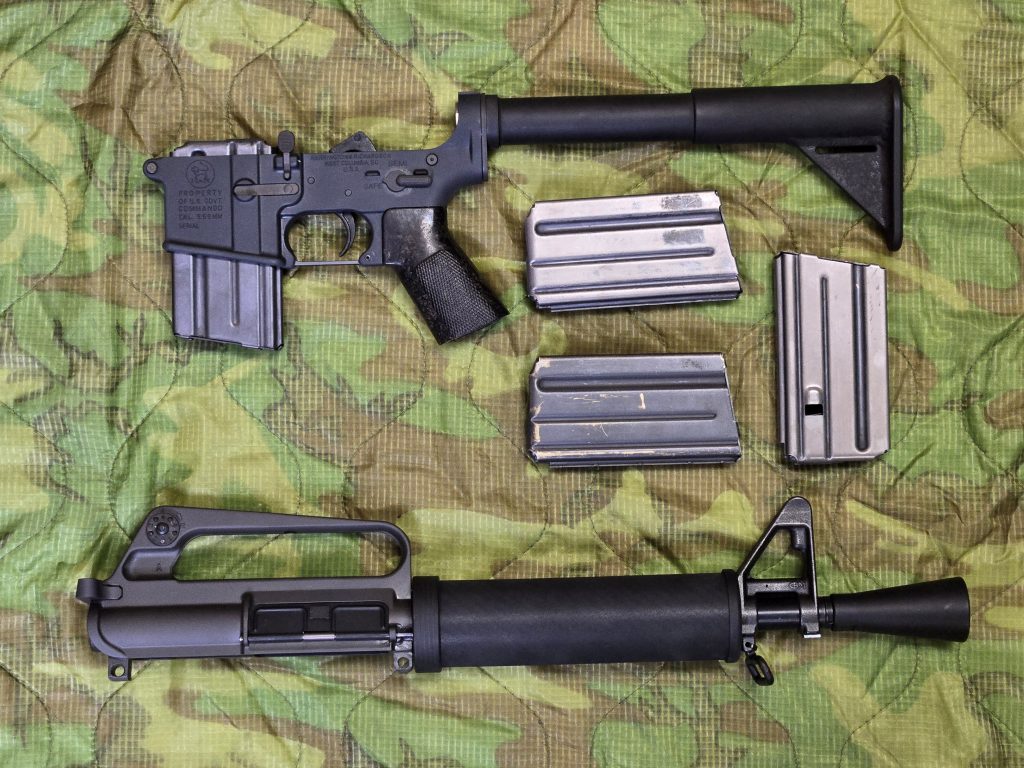
So once you have the American Icon kit you still need the core of the gun to put those parts on. The 608 used a partial fence lower so I grabbed a gray anodized one from Harrington & Richardson. Since one with a 608 marking isn’t readily available, I picked one of their blem Commando marked lowers. As usual, I can’t tell what the bem was supposed to be.
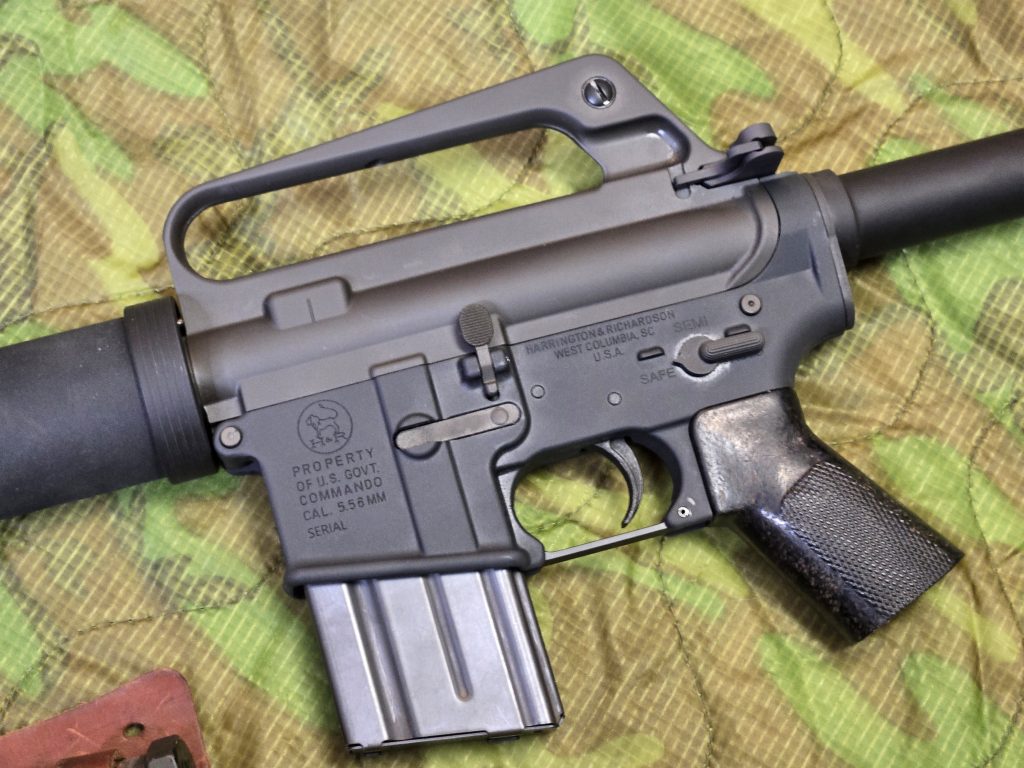
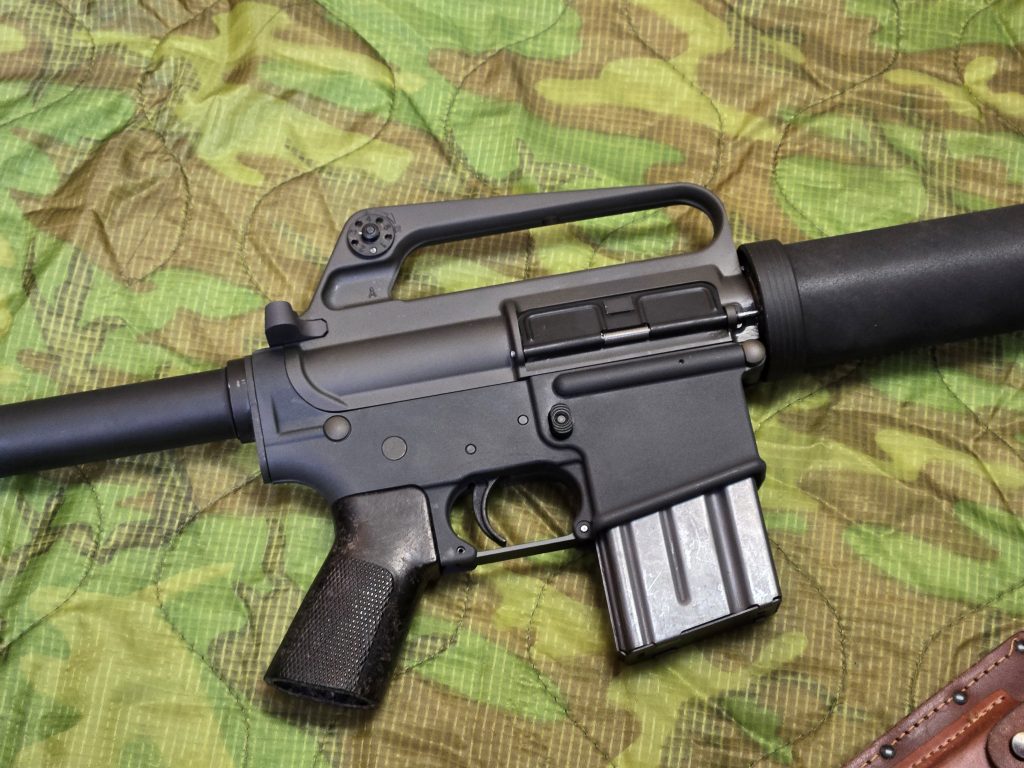
Since I was ordering from them anyway I also picked up a gray charging handle and BCG, a gray mag release button, and gray trigger guard. I also picked up an M16A1 safety, A1 rear sight kit, and slabside upper, although those were only available in black. I had a lower parts kit from B. King Firearms that I would use for the rest of the parts, and already had a small pad dust cover from Brownells. Although the grip that came with the kit is perfectly fine, I already had an old Colt Bakelite grip like the original 608’s used that I’d chopped for another project, so I decided to use that.
Since my upper and some of the small parts were black, I used Norrell’s Moly Resin in the Colt Flat Dark Gray color and sprayed and baked them. Of course when I was finished the upper and parts were a lighter shade of gray than the H&R lower, but that’s the nature of gray. Mismatched gray is common, so I’m okay with that. It’s the correct finish for the era, and looks better than a gray lower and black upper.
The last thing I needed was a barrel. The 608 used a 10 inch barrel. 10.5 inch 5.56mm AR barrels are common, but 10’s not so much. Luckily I found that Diamondback Firearms makes a 10 and it’s actually very reasonably priced. I picked mine up through Primary Arms for only $75. It has a government profile, which I’m pretty confident is not correct to the original 608, but with the handguard installed you can’t tell anyway. You could use a 10.5 inch barrel as well, but the flash hider will protrude a bit further from the FSB than the real 608’s. It all depends on your level of OCD how much that will bug you.
608 Assembly: Not So Fast!
Once you have all of your parts together, you can start putting your 608 together. Or can you? One thing to keep in mind is that when the 608 is fully assembled it is a Short barrel Rifle (SBR) so it will require a tax stamp for US residents. You can build it with a 16 inch barrel, but that really defeats the purpose of a 608 in my opinion. Thankfully with the e-file system ATF has been approving Form 1’s in record time lately for most folks. I filed my Form 1 as soon as I got my lower. My approval came though in under two business days. I got my required receiver markings done while I waited so when the tax stamp dropped, I was ready to build.
Putting everything together was pretty straight forward if you’ve ever built an AR. Lower and upper assembly are just like any other AR. I used the H&R rear sight kit but I did cheat on one thing. I used an A2 rear aperture rather than the A1. I know, that violates clone correctness, but I prefer the bigger aperture on the A2, especially on a short carbine like this. My old eyes find the bigger aperture much easier to use than the tighter A1 rear sight.
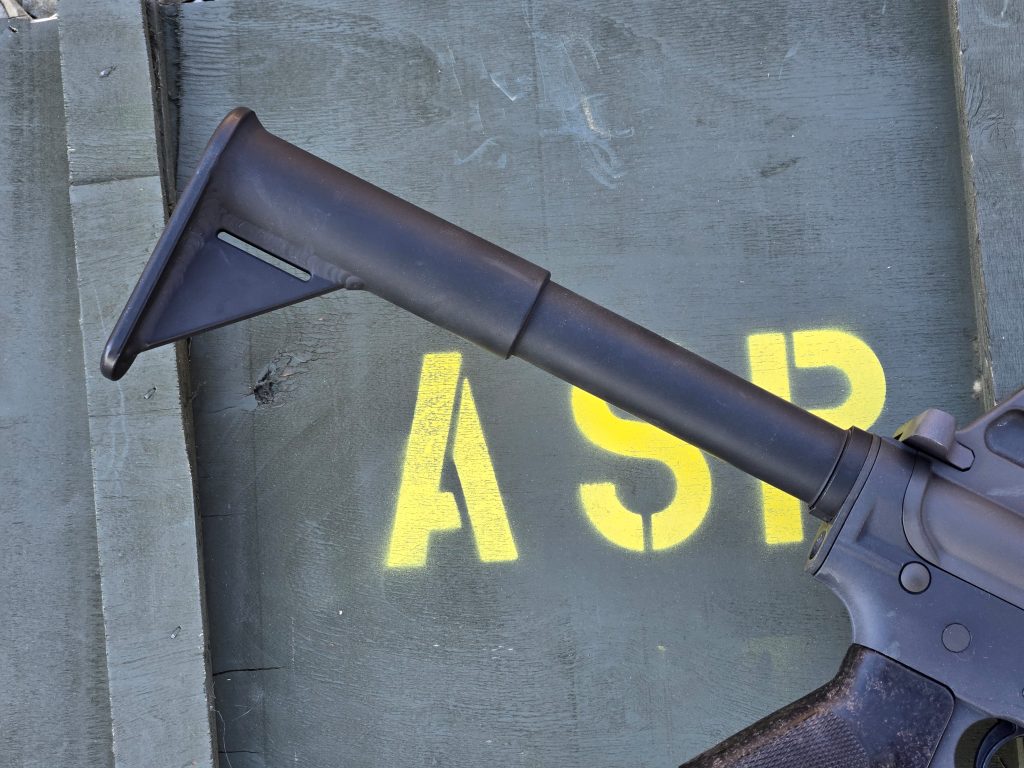
Installing the receiver extension/stock is slightly different. You slip on the end plate of your choice, and screw in the tube as normal. I did note that the threading is a little shorter than a typical CAR or M4 tube and it was tight rotating the end plate in place. I may have lightly malletized mine to knock it in place. Once that’s where it should be you tighten up the castle nut. The 608 extension has 1 1/4 inch size receiver flats, not the holes or notches on typical castle nuts. I used a crescent wrench wrench from y tool box for that.
Moving forward to barrel installation, the kit comes with a barrel nut that uses a standard military barrel wrench to install. My Magpul wrench worked fine. There aren’t many, if any, good breakdowns of how the original tubes were installed but the American Icon one works well. It’s easy to install and free floats the carbon fiber tube. A steel end cap slides on the end with holes that allow the gas tube to pass through. I did note that the holes in the barrel nut were much easier to line up than the usual military spring and nut assembly.
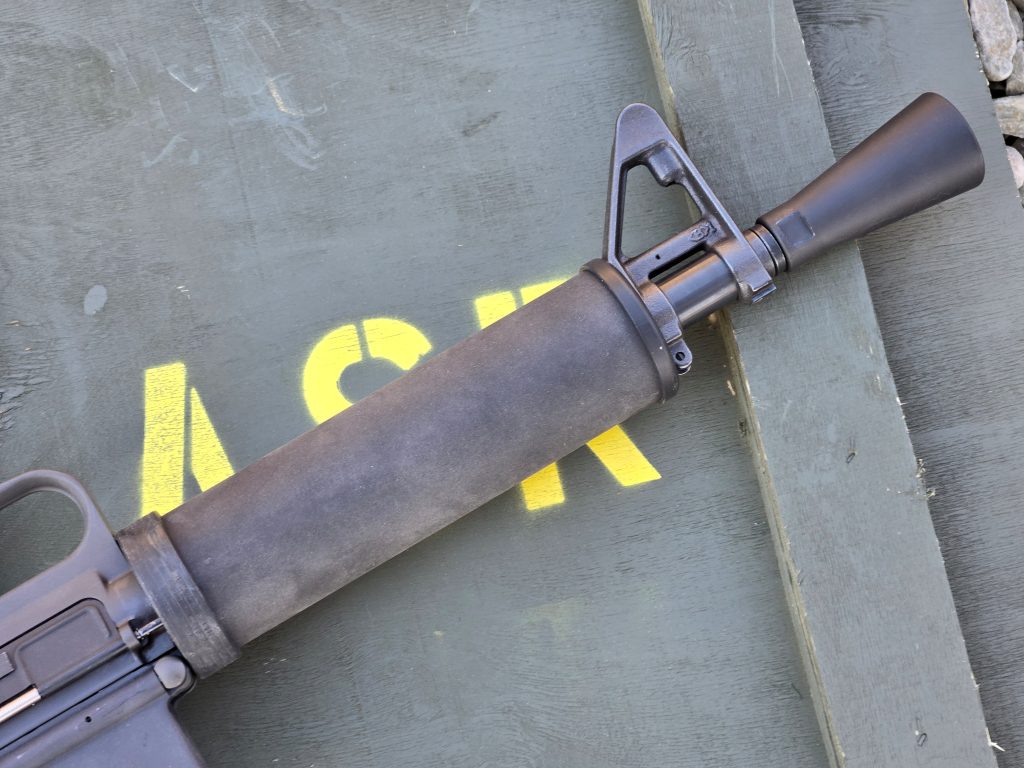
With the barrel screwed on, and the handguard in place, you just need to slide the FSB onto the barrel and snug it up on the barrel step. Make sure the sight is level, then tighten down the two set screws on the bottom. I use a dowel rod that I drop in the carry handle and line up with the front sight base wings. Then I check it with my Mark I eyeball and verify.
The only thing I’d note is that the FSB is a tight fit in front of the end cap. You have to make sure the handguard tube is screwed all the way down to give yourself enough clearance to properly align the FSB. To do this, screw the rear collar piece down until it touches the upper receiver and back the handgaurd off as far back as it will go. Then, install the end cap, and then FSB. Line the rear set screw up with the barrel dimple (assuming your barrel has one) and snug the FSB screws down. Once that’s done screw the handguard as far forward into the end cap as it will go, and tighten up the collar ring.
Once the FSB is locked down you can add a front sling swivel and either peen it with a rivet like the originals or use a nut and bolt to hold it in place. The advantage of a nut is that you can remove it easily if you need to break the forend down. If you peen the rivet you’ll have to knock that out to access the rear set screw on the FSB. I peened mine after my range trip and I was sure everything functioned. It’s not a big deal to knock it out if needed and replacement rivets are cheap.
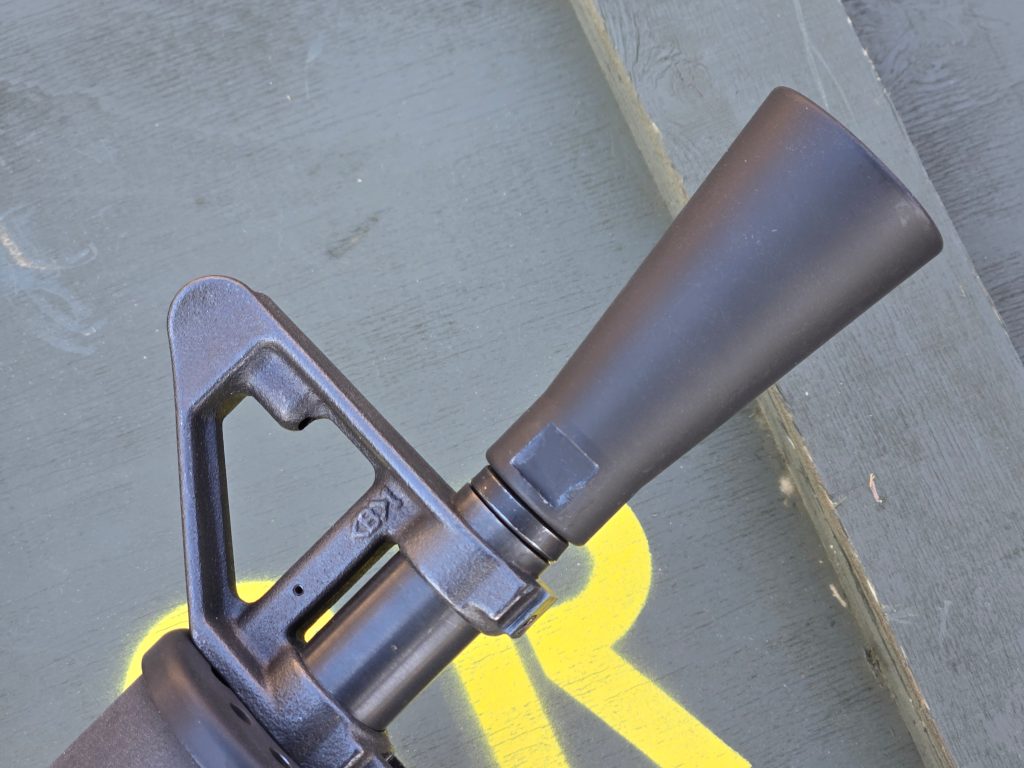
The conical flash hider goes on next. Just slide the split ring on and screw the flash hider in pace. Due to the cone you can’t get a regular barrel wrench on the flash hider but a 3/4 inch crescent wrench worked perfectly. The last thing I did was add my bakelite grip and I was done. It was a pretty easy build.
Handling the 608
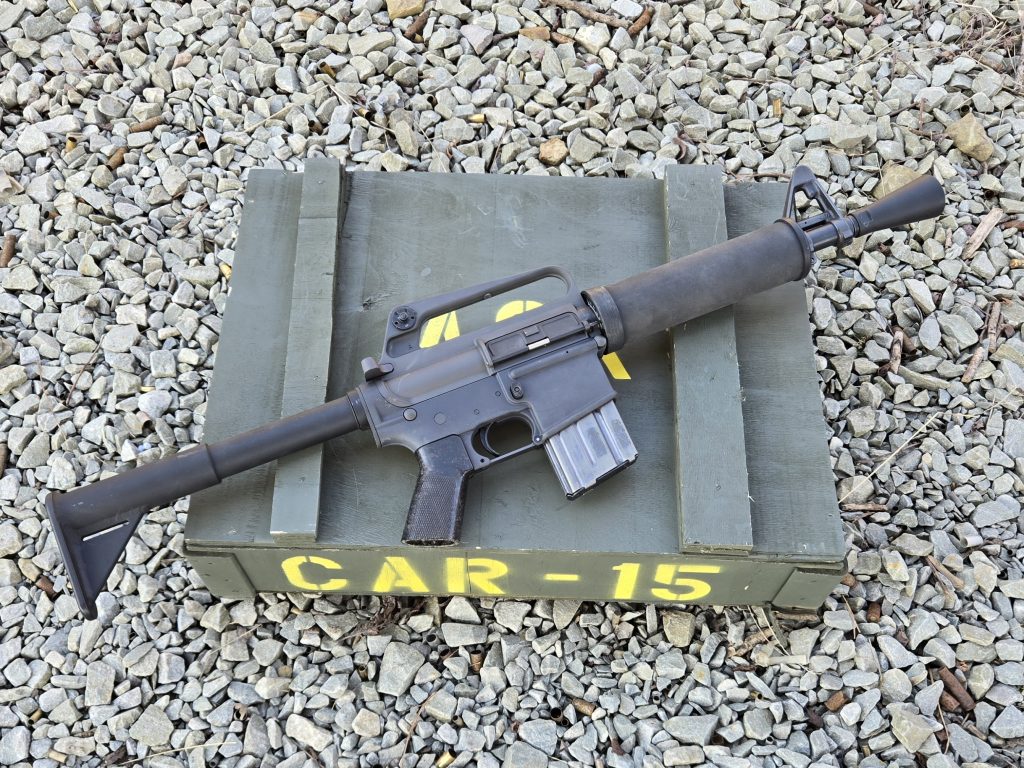
I’ve only ever seen pictures of a 608. I’ve never seen one in person let alone handled one so this was my first experience with one. I will say, it’s a neat set up. It’s a short, handy package. The overall length is just 29.75 inches, and weight is 5.5 pounds empty. The stock is 9.5 inches, long, just a bit shorter than an A1 stock. Length of pull on the fixed stock is 13 inches. It shoulders easily.
Some might question the chopped grip. It’s accurate to the original 608, to minimize size for stowage under a fighter’s seat. So it’s correct for the build. That’s a good enough reason to use it for me. Honestly though, I found that it works fine. I did a similar chop on my N23A1 build and actually found it was pretty comfortable. I get a solid two finger grip on it and curl my pinky underneath.
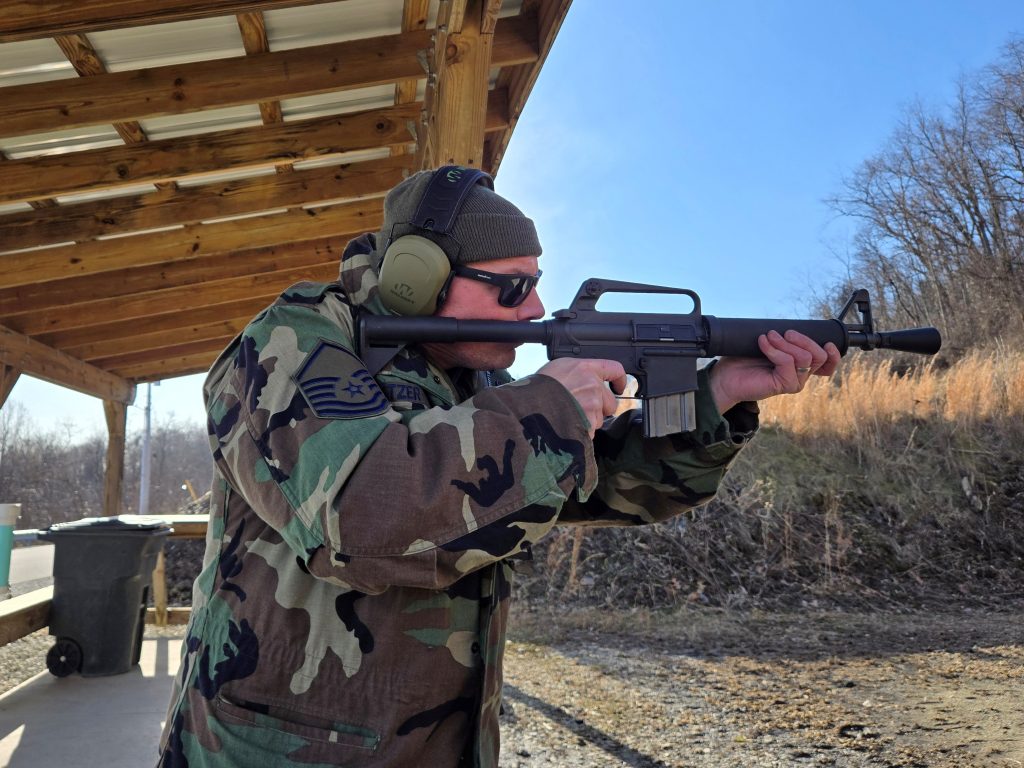
I built this at the beginning of January and Pittsburgh weather was not especially cooperative as far as getting to the range. I finally had a day where the snow had melted and it was a balmy 32 degrees and sunny. I dug out my old Air Force field jacket for the range trip, which I figured was appropriate for shooting the 608. I ran a mix of 55gr and 62gr 5.56mm FMJ loads through the 608 using old Vietnam era 20 round M16 magazines. I loaded using my Podavach loader that I picked up in the Fall. It makes loading mags ridiculously easy, and I can’t believe it took me this long to grab one.
Despite some folks calling the cone shaped flash hider a “loudener” I didn’t think the 608 was any worse than any other short barrel 5.56mm I’ve used. Recoil was mild as expected, even with the steel butt plate. I did notice that the steel but plate would slip a little on the shoulder, being that’s it’s a smooth back, but that’s how the originals are too. I just shot on the 25 yard range and was shooting at one liter bottles and tennis balls. I did all of my shooting standing, offhand. The liter bottles were easy prey for the 608, and I was able to chase the tennis ball around the backstop steadily too. For a 10 inch survival gun I’ll take that, at least until it warms up enough for me to do more serious shooting. In total I ran about 200 rounds through the 608 on my first rang session with only one failure to feed, which I think was a result of me not locking the mag in place. Once I smacked the mag and recharged the carbine I didn’t have any further issues.
While having a rare and cool retro vibe, it’s honestly a pretty handy little rifle in its own right. It would have made a great survival gun had it been adopted, and still will fill that role nicely today.
Filling the Niche
The 608 build isn’t cheap once you get the kit, the upper and lower, and barrel and add in a tax stamp. So I know this isn’t a build for everyone. However, if you’ve wanted to fill that 608 niche in your collection, or maybe just discovered them but now know you need one, this is a great way to do it. The American Icon kit gives you all of the hard to source parts to make your 608 dreams easy to accomplish, and while it’s a bit of an investment, it’s still a lot more affordable than previous 608 build options.
For more information on American Icons 608 kit, wood AR stocks, and to keep an eye out for future projects, check out their website at American-Icon.us.